A few years ago, I started going down the rabbithole of browser engines. I wanted to write one, so I started looking for resources. None were as detailed as I had hoped. So, I decided to simply read the official specification (rather, the set of interleaved specifications). Understanably, the spec didn’t explain how a browser engine works, just what its result should be. So I started designing a browser engine – just to find out some time later that my design was horrible from the beginning. Well… I restarted the entire project from scratch more than 10 times.
The current iteration has lasted for half a year so far, and I’m still confident it is the right design. Finally, I feel perpared to write something I wish existed when I started: an explanation of how browsers actually work.
The browser and the browser engine
A browser and a browser engine are two distinct things. The program you install on your computer is the browser. It is composed of two parts: the chrome (not to be confused with the browser of the same name) and the browser engine.
The browser engine is the part that parses HTML, does layout or runs JS, whereas you can think of the chrome as “the UI”. The browser engine doesn’t know anything about tabs, windows or downloads, those are all part of the chrome. For example, Firefox, Chrome or Opera are browsers. Blink, WebKit or Gecko are browser engines. This post will be centered around the browser engine, since it’s the core of the browser (and the interesting part).
The main pipeline
The main task for the browser engine is transforming an HTML source into a drawable page. The output of this whole pipeline will be a draw list or display list. It is a list of simple commands like “draw a rectangle of color C at position (X,Y) and of size W by H”. But doing this directly would be absurdly hard. So we split it into simpler tasks, forming a pipeline.

I will explain, one by one, each of the components of the pipeline.
HTML tokenizer
The HTML tokenizer takes HTML source (text) as input and returns a list of tokens. Tokens are the most basic syntactic units. A comment is a token, a tag is a token, text is a token, etc. As an example, the following HTML source would be tokenized as follows:
<!DOCTYPE html>
<html>
  <body>
    <div id="foo">
      Hello world
    </div>
  </body>
</html>
- Doctype token
- Start tag token for
html(no attributes) - Start tag token for
body(no atrributes) - Start tag token for
div(withid="foo") - Text token
"Hello world" - End tag token for
div - End tag token for
body - End tag token for
html
It is usually a simple state machine, following the spec.
HTML parser
The HTML parser (sometimes called the tree constructor) takes tokens as input and generates a DOM (Document Object Model). It does this by first creating an empty DOM and, for each token, modifying it incrementally. Again, this is pretty well-defined in the spec. The code from before would generate a DOM similar to:
- Document
htmlbodydiv#text "Hello world"
Notice that it is in this step that structure is introduced. The DOM is where elements live, and where modifications from javascript happen (causing a cascading effect onwards).
CSS tokenizer and parser
With the CSS sources we found in the DOM (<script>) and the ones included in the browser (the so-called user agent CSS) we do a process similar to the HTML tokenizer and parser. We obtain a CSSOM (CSS Object Model).
Style engine
This stage takes the DOM and CSSOM and combines them, by computing the style properties for every element, producing the style tree. Think of the style tree as a DOM with extra information for each element.
This is where CSS selector matching is checked. If we have a rule like .foo { color: red }, it will modify the color property of each element with the class foo. Other elements will have the default value for that property.
Box generation
Elements are an abstract concept of the DOM. Boxes, on the other hand, are “physical” boxes. You can think of them as rectangles with size, position, etc. But before we can give them size and position values, we need to generate the boxes. From the style tree, we create a layout tree, where nodes are boxes. Generally, an element translates into a single box. But it’s not always the case. For example, an element with display: none generates no box at all (and neither do their descendants). In some cases, an element can even generate multiple boxes (think of a <ul>, it has a “marker” box and a “content” box).
Boxes also have padding, margin, border, color, border color, display type (e.g. block or inline), etc. All these properties are derived from the associated style in the style tree. Only the position and size properties are left undefined (for now).
Reflow
We now have a tree of boxes (the layout tree). Reflow modifies the tree, giving it position and size information, according to a layout scheme. This is probably the most complex stage of the entire main pipeline, but I’ll do my best to explain it properly.
There are many types of flow, each with its own reflow algorithm. Most elements follow normal flow (position: static). In normal flow, boxes are laid out depending on many parameters, but mainly:
- Block-level or inline-level
- Block container or inline container
In case you’re curious, this is where display: inline-block does its thing. Take a look at the mappings:
Value of display | Box level | Container type |
|---|---|---|
block | block-level | block container |
inline | inline-level | inline container |
inline-block | inline-level | block container |
Let’s assume, for the sake of simplicity, that everything is a block box (a block box is a box which is both block-level and a block container).
The way the reflow algorithm would work would be:
- Determine my width from the containing block
- Reflow children
- Determine my height from the sum of heights of my children (or properties like
height)
So, in this layout:
The steps, recursively, would be:
- Reflow the red box
- Determine the width of the red box
- Reflow the green box
- Determine the width of the green box
- Determine the height of the green box
- Reflow the blue box
- Determine the width of the blue box
- Reflow the yellow box
- Determine the width of the yellow box
- Determine the height of the yellow box
- Reflow the pink box
- Determine the width of the pink box
- Determine the height of the pink box
- Reflow the yellow box
- Determine the height of the blue box
- Determine the width of the blue box
- Reflow the green box
- Determine the height of the red box
- Determine the width of the red box
Of course this gets much more complicated with more complex layouts, but the algorithms generally work in a pretty similar way to the one I described.
Painting
We now have a complete layout tree. To paint it, we can walk the tree, emitting “commands” for each node. For example, if an element has a background color assigned, we can emit a command to draw a rectangle on screen on the correct coordinates.
When I say emit what I really mean is append it to a sequence of commands which, as we discussed earlier, will be the output of the entire pipeline. The browser (not browser engine) will then take those commands and actually draw it on screen in a platform-specific way.
That was quite long, just to explain the main pipeline, huh?
My engine
This whole time I haven’t talked about my engine at all. And honestly, that’s because I don’t have much to show. I was planning on writing a post about it when it got more advanced, but I wanted to do this post explaining concepts in general. Since we’re at it, here’s a sneak peak of what (mostly) works:
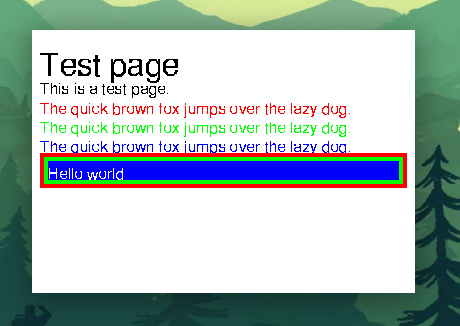
I know, it’s not very amusing, and the text is barely readable1, but it shows it can render something. Here’s the exact HTML in case you’re interested:
<!DOCTYPE html>
<html>
  <head>
    <title>Test page</title>
  </head>
  <body>
    <h1>Test page</h1>

    <p>This is a test page.</p>

    <p style="color: red">The quick brown fox jumps over the lazy dog.</p>
    <p style="color: green">The quick brown fox jumps over the lazy dog.</p>
    <p style="color: blue">The quick brown fox jumps over the lazy dog.</p>

    <div style="background-color: #c00000; padding: 4px; color: white">
      <div style="background-color: #00c000; padding: 4px">
        <div style="background-color: #0000c0">
          <p>Hello world</p>
        </div>
      </div>
    </div>
  </body>
</html>
The engine source is on codeberg